Kubernetes Services and Service Discovery

Kubernetes Services and Service Discovery are essential components of a Kubernetes cluster that allow you to expose your applications and services to the outside world and discover other services and pods within the cluster.
Kubernetes Services are a way to expose a set of pods as a network service. Services provide a stable IP address and DNS name to access a set of pods, which can be dynamically created and destroyed based on scaling requirements. They allow for load balancing of network traffic across multiple instances of an application.
Service Discovery in Kubernetes is the process of discovering and accessing services within a cluster. Kubernetes provides several mechanisms for service discovery, including environment variables, DNS, and Kubernetes API. Environment variables are automatically created for each service, allowing applications to discover the IP addresses and ports of other services. DNS provides a mechanism for accessing services by name instead of IP address, and Kubernetes automatically creates DNS records for each service. The Kubernetes API can also be used to discover and access services within a cluster.
Exposing Kubernetes Workloads to the Outside World Using Services
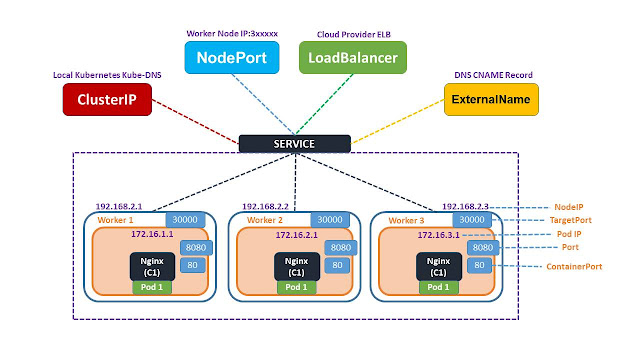
Kubernetes Services provide a way to expose your application or service to the outside world, whether it's an external client, another service in the cluster, or a load balancer. There are several types of services available in Kubernetes, including:
ClusterIP: This is the default service type that creates a virtual IP address for the service within the cluster.
NodePort: This type exposes the service on a specific port on all nodes in the cluster.
LoadBalancer: This type creates a load balancer in the cloud provider's infrastructure and maps it to the service.
ExternalName: This type maps the service to an external DNS name.
ClusterIP
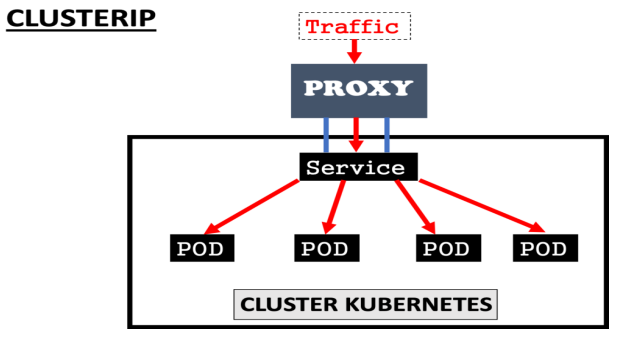
A ClusterIP service is the default service type that creates a virtual IP address for the service within the cluster. This IP address is only accessible from within the cluster and is not exposed to the outside world.
To create a ClusterIP Service, you can use the following YAML manifest:
 apiVersion: v1
 kind: Service
 metadata:
   name: my-service
 spec:
   selector:
     app: my-app
   ports:
   - name: http
     port: 80
     targetPort: 8080
   type: ClusterIP
In this manifest, we have defined a ClusterIP Service named "my-service" that selects Pods with the label "app=my-app". The Service exposes port 80, which is mapped to the targetPort 8080 on the Pods.
To create this Service, save the manifest to a file named
my-service.yamland run the following command:kubectl apply -f my-service.yamlYou can verify that the Service has been created by running the following command:
kubectl get servicesYou should see the Service "my-service" listed in the output. Note the "CLUSTER-IP" column, which shows the virtual IP address of the Service.
To access the Service from within the cluster, you can use the virtual IP address and port number. For example, if the virtual IP address is 10.0.0.1 and the port number is 80, you can access the Service using the URL "http://10.0.0.1:80".
NodePort
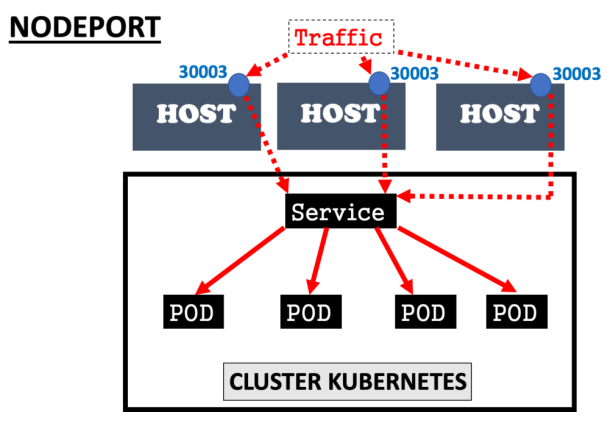
A NodePort service exposes the service on a specific port on all nodes in the cluster. This allows the service to be accessible from outside the cluster, but it requires that the client knows the IP address of one of the nodes.
To create a NodePort Service, you can use the following YAML manifest:
 apiVersion: v1
 kind: Service
 metadata:
   name: my-service
 spec:
   selector:
     app: my-app
   ports:
   - name: http
     port: 80
     targetPort: 8080
   type: NodePort
In this manifest, we have defined a NodePort Service named "my-service" that selects Pods with the label "app=my-app". The Service exposes port 80, which is mapped to the targetPort 8080 on the Pods.
To create this Service, save the manifest to a file named
my-service.yamland run the following command:kubectl apply -f my-service.yamlYou can verify that the Service has been created by running the following command:
kubectl get servicesYou should see the Service "my-service" listed in the output. Note the "NODEPORT" column, which shows the port number that the Service is exposed on each node in the cluster.
To access the Service from outside the cluster, you can use the IP address of one of the nodes and the NodePort number. For example, if the IP address of the node is 10.0.0.2 and the NodePort number is 30000, you can access the Service using the URL "http://10.0.0.2:30000".
LoadBalancer

A LoadBalancer service creates a load balancer in the cloud provider's infrastructure and maps it to the Service. This allows the Service to be accessible from outside the cluster, and the load balancer distributes the traffic across the nodes that are running the Pods.
To create a LoadBalancer Service, you can use the following YAML manifest:
 apiVersion: v1
 kind: Service
 metadata:
   name: my-service
 spec:
   selector:
     app: my-app
   ports:
   - name: http
     port: 80
     targetPort: 8080
   type: LoadBalancer
In this manifest, we have defined a LoadBalancer Service named "my-service" that selects Pods with the label "app=my-app". The Service exposes port 80, which is mapped to the targetPort 8080 on the Pods.
To create this Service, save the manifest to a file named
my-service.yamland run the following command:kubectl apply -f my-service.yamlYou can verify that the Service has been created by running the following command:
kubectl get servicesYou should see the Service "my-service" listed in the output. Note the "EXTERNAL-IP" column, which shows the IP address of the load balancer.
To access the Service from outside the cluster, you can use the IP address of the load balancer and port number. For example, if the IP address of the load balancer is 203.0.113.1 and the port number is 80, you can access the Service using the URL "http://203.0.113.1:80".
ExternalName

An ExternalName service maps the Service to an external DNS name. This is useful when you want to expose a Service that is running outside the cluster, such as a database or API endpoint.
To create an ExternalName Service, you can use the following YAML manifest:
 apiVersion: v1
 kind: Service
 metadata:
   name: my-service
 spec:
   type: ExternalName
   externalName: my.database.com
In this manifest, we have defined an ExternalName Service named "my-service" that maps the Service to the external DNS name "my.database.com".
To create this Service, save the manifest to a file named
my-service.yamland run the following command:kubectl apply -f my-service.yamlYou can verify that the Service has been created by running the following command:
kubectl get servicesYou should see the Service "my-service" listed in the output. Note the "EXTERNAL-NAME" column, which shows the external DNS name of the Service.
To access the Service, you can use the external DNS name. For example, if the external DNS name is "my.database.com", you can access the Service using the URL "http://my.database.com".
Discovering Services and Pods Within a Kubernetes Cluster Using DNS and Other Mechanisms
Kubernetes provides several mechanisms for discovering Services and Pods within a cluster, including DNS, environment variables, and the Kubernetes API.
DNS
Kubernetes provides a built-in DNS server that maps Service names to their IP addresses within the cluster. This allows you to access Services and Pods using their names instead of their IP addresses, which can be more convenient and easier to manage.
To test DNS resolution within the cluster, you can create a BusyBox Pod and use it to resolve DNS names. To create the Pod, run the following command:
kubectl run busybox --image=busybox:1.28 --restart=Never --rm -it -- nslookup my-service.my-namespace.svc.cluster.localThis command creates a Pod named "busybox" that runs the BusyBox image and runs the
nslookupcommand to resolve the DNS name "my-service.my-namespace.svc.cluster.local". Note that you need to replace "my-service" and "my-namespace" with the name and namespace of your Service.You should see the IP address of the Service listed in the output, which confirms that DNS resolution is working properly.
Environment Variables
Kubernetes sets environment variables for each container in a Pod that contain information about the Pod and the Services that are available in the cluster. This allows you to access Services and Pods using environment variables, which can be more convenient and easier to manage than hard-coding IP addresses or DNS names.
To access a Service from within a Pod using environment variables, you can use the following Bash script:
  #!/bin/bash

  SERVICE_HOST=$MY_SERVICE_HOST
  SERVICE_PORT=$MY_SERVICE_PORT

  curl http://$SERVICE_HOST:$SERVICE_PORT/api
This code uses the environment variables "MY_SERVICE_HOST" and "MY_SERVICE_PORT" to construct the URL of the Service and sends a GET request to the "/api" endpoint. You can replace "/api" with the endpoint of your application.
Kubernetes API
To access the Kubernetes API from within a Pod, you can use the Kubernetes command-line tool
kubectl. Thekubectltool provides an easy-to-use interface for interacting with the Kubernetes API.For example, here's how you can list all the Services in the "my-namespace" namespace using the
kubectltool:kubectl get services -n my-namespaceThis command lists all the Services in the "my-namespace" namespace.
To get detailed information about a specific Service named "my-service" in the same namespace, you can use the following command:
kubectl describe service my-service -n my-namespaceThis command shows detailed information about the Service named "my-service" in the "my-namespace" namespace.
To watch for changes to all the Pods in the same namespace, you can use the following command:
kubectl get pods -n my-namespace -wThis command lists all the Pods in the "my-namespace" namespace and watches for changes in real-time.
You can also access the Kubernetes API directly from your application code using the Kubernetes client library for your programming language. The client library provides an easy-to-use interface for interacting with the Kubernetes API.
For example, here's how you can list all the Services in the "my-namespace" namespace using the Python client library:
  from kubernetes import client, config
  config.load_kube_config()
  v1 = client.CoreV1Api()
  services = v1.list_namespaced_service(namespace='my-namespace')
  for service in services.items:
      print(service.metadata.name)
This code loads the Kubernetes configuration and creates a client object for the Kubernetes API. It then lists all the Services in the "my-namespace" namespace and prints their names.
You can use the client library to perform a wide range of operations on Services and Pods, including creating, updating, and deleting them, as well as retrieving logs and metrics.
Conclusion
Kubernetes Services and Service Discovery are essential components of a Kubernetes cluster that allow you to expose your applications and services to the outside world and discover other services and pods within the cluster. By understanding the different types of services available in Kubernetes and their implementation details, you can create more robust and scalable applications on Kubernetes.
I have discussed the various types of Services available in Kubernetes, including ClusterIP, NodePort, LoadBalancer, and ExternalName, and how to create and discover them using various mechanisms, such as DNS, environment variables, and the Kubernetes API. I have also provided sample YAML and Bash codes for creating and accessing the services.
Kubernetes Services and Service Discovery are powerful tools for managing network traffic in a distributed system. They enable you to build resilient and highly available microservices that can be easily scaled to meet the demands of your application. With the knowledge gained from this blog post, you can take your Kubernetes skills to the next level and build even more complex and robust applications.

Thank you for reading this Blog. Hope you learned something new today! If you found this blog helpful, please like, share, and follow me for more blog posts like this in the future.
If you have some suggestions I am happy to learn with you.
I would love to connect with you on LinkedIn
Meet you in the next blog....till then Stay Safe ➕ Stay Healthy
#HappyLearning #Kubernetes #Services #ServiceDiscovery #LoadBalancer #ClusterIP #NodePort #ExternalName #DNS #EnvironmentVariables #KubernetesAPI #Python #Bash #YAML #CloudNative #Containerization #DevOps #Microservices #Scalability #Reliability #devops #Kubeweek #KubeWeekChallenge #TrainWithShubham #KubeWeek_Challenge #kubeweek_day4


