Kubernetes Networking - A Guide to Services, Ingress, Network Policies, DNS, and CNI Plugins
Kubernetes networking is a complex topic that is critical to the successful deployment and operation of a Kubernetes cluster. In this blog post, we'll cover the key networking concepts and components in Kubernetes, including Services, Ingress, Network Policies, DNS, and CNI plugins. We'll also provide advanced explanations and code examples to help you understand how to configure and manage Kubernetes networking for your specific use case.
Kubernetes Networking Architecture
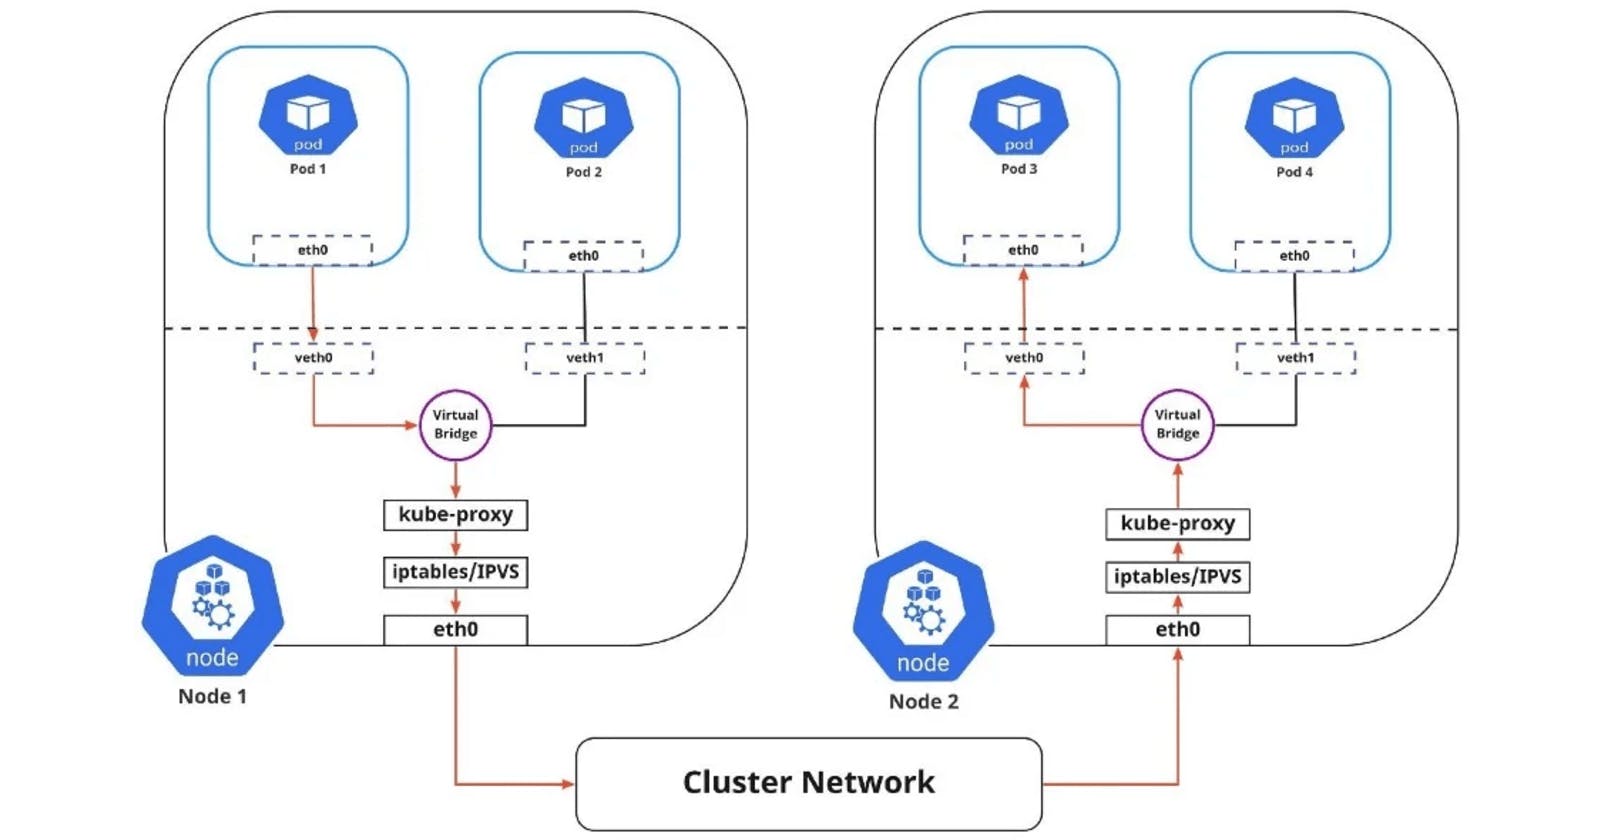
Kubernetes networking is based on a virtual network overlay that is created on top of the physical network infrastructure. Each pod in the cluster has a unique IP address, and all containers in the pod share the same network namespace. The virtual network is created and managed by CNI plugins, which are responsible for configuring network interfaces on the nodes in the cluster and creating the virtual network.
Services
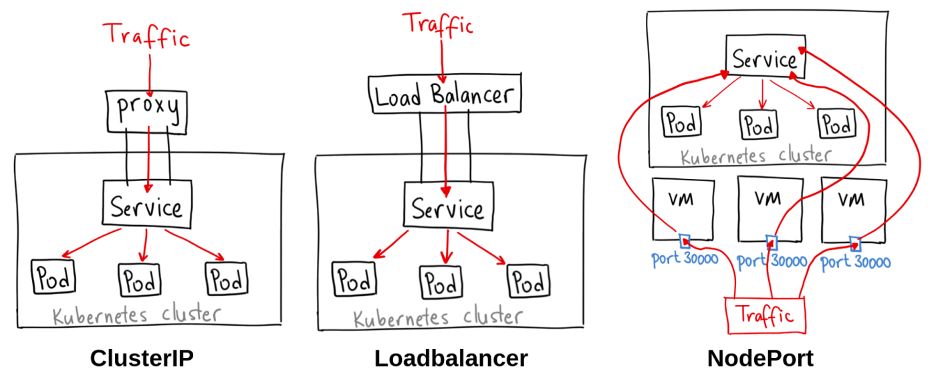
In Kubernetes, Services provide a way to expose a set of pods as a network service. A Service has a stable IP address and DNS name, and it provides a single entry point for accessing a set of pods. Services can be exposed within the cluster or externally, depending on the use case.

There are three types of Services in Kubernetes:
ClusterIP Service
NodePort Service
LoadBalancer Service
ClusterIP Service
A ClusterIP Service is an internal Service that is only accessible within the cluster. It exposes the pods within the same namespace as the Service using a stable IP address and DNS name. This type of Service is useful for providing access to internal components, such as a database or a message queue.
To create a ClusterIP Service, you can use the following YAML file:
  apiVersion: v1
  kind: Service
  metadata:
    name: my-service
  spec:
    selector:
      app: my-app
    ports:
    - name: http
      port: 80
      targetPort: 80
    type: ClusterIP
In this YAML file,
my-serviceis the name of the Service,my-appis the label selector for the pods that will be part of the Service,80is the port number for the Service, andClusterIPis the type of Service.NodePort Service
A NodePort Service is a Service that is exposed on a specific port on each node in the cluster and is accessible both within and outside the cluster. This type of Service is useful for providing access to a web application or API.
To create a NodePort Service, you can use the following YAML file:
  apiVersion: v1
  kind: Service
  metadata:
    name: my-service
  spec:
    selector:
      app: my-app
    ports:
    - name: http
      port: 80
      targetPort: 80
    type: NodePort
In this YAML file,
my-serviceis the name of the Service,my-appis the label selector for the pods that will be part of the Service,80is the port number for the Service, andNodePortis the type of Service.LoadBalancer Service
A LoadBalancer Service is a Service that is exposed externally and typically requires an external load balancer to be configured. This type of Service is useful for providing access to a web application or API from outside the cluster.
To create a LoadBalancer Service, you can use the following YAML file:
  apiVersion: v1
  kind: Service
  metadata:
    name: my-service
  spec:
    selector:
      app: my-app
    ports:
    - name: http
      port: 80
      targetPort: 80
    type: LoadBalancer
In this YAML file,
my-serviceis the name of the Service,my-appis the label selector for the pods that will be part of the Service,80is the port number for the Service, andLoadBalanceris the type of Service.
Ingress

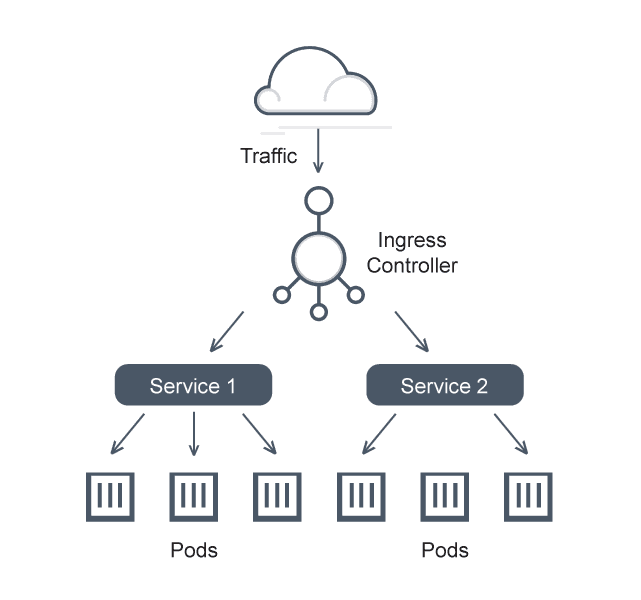
In Kubernetes, Ingress is a resource that provides a way to expose HTTP and HTTPS services to the outside world. Ingress works by defining a set of rules that map incoming requests to backend services running in the cluster. Ingress can be used to define URL-based routing, SSL termination, and load-balancing rules.
To use Ingress, you'll need to have an Ingress controller running in your cluster. An Ingress controller is a component that is responsible for managing Ingress resources and implementing the rules defined in the Ingress objects.
To create an Ingress resource, you can use the following YAML file:
apiVersion: networking.k8s.io/v1
kind: Ingress
metadata:
  name: my-ingress
  annotations:
    nginx.ingress.kubernetes.io/rewrite-target: /
spec:
  rules:
  - host: myapp.example.com
    http:
      paths:
      - path: /my-app
        pathType: Prefix
        backend:
          service:
            name: my-service
            port:
              name: http
In this YAML file, my-ingress is the name of the Ingress resource, myapp.example.com is the hostname that the Ingress will be mapped to, /my-app is the URL path that will be used to route traffic to the Service, my-service is the name of the Service that the Ingress will route traffic to, and http is the name of the port on which the Service is listening.
Network Policies
Network policies are used to define rules that govern how pods can communicate with each other within the cluster. Network policies are enforced by the CNI plugin and can be used to define rules based on IP addresses, ports, and protocols.
To create a NetworkPolicy, you can use the following YAML file:
apiVersion: networking.k8s.io/v1
kind: NetworkPolicy
metadata:
  name: my-network-policy
spec:
  podSelector:
    matchLabels:
      app: my-app
  policyTypes:
  - Ingress
  ingress:
  - from:
    - podSelector:
        matchLabels:
          app: other-app
    ports:
    - protocol: TCP
      port: 8080
In this YAML file, my-network-policy is the name of the NetworkPolicy, my-app is the label selector for the pods that will have this policy applied, Ingress specifies that this policy applies to incoming traffic, and other-app is the label selector for the pods that are allowed to access my-app pods over TCP port 8080.
DNS
DNS plays a critical role in Kubernetes networking, as it allows containers and services to communicate with each other using friendly names instead of IP addresses. Kubernetes includes a built-in DNS service that maps service names to their corresponding IP addresses.
To test DNS resolution in Kubernetes, you can use the following command:
kubectl run -it --rm --restart=Never busybox --image=busybox:1.28 -- nslookup my-service
In this command, busybox is the name of the container image that is used to launch a new pod, and my-service is the name of the service that you want to test DNS resolution for.
CNI Plugins

CNI plugins are responsible for configuring network interfaces on the nodes in the cluster. CNI plugins also provide network policies that define how containers can communicate with each other. There are several CNI plugins available for Kubernetes, including Calico, Flannel, and Weave Net.
Calico
Calico is a popular CNI plugin for Kubernetes that provides advanced network policies and security features. Calico uses BGP to distribute routing information between nodes in the cluster, enabling it to support large-scale deployments.
To install Calico, you can use the following command:
kubectl apply -f https://docs.projectcalico.org/manifests/tigera-operator.yamlFlannel
Flannel is a lightweight CNI plugin for Kubernetes that provides basic networking functionality. Flannel uses a simple overlay network to connect containers across nodes in the cluster.
To install Flannel, you can use the following command:
kubectl apply -f https://raw.githubusercontent.com/coreos/flannel/master/Documentation/kube-flannel.ymlWeave Net
Weave Net is a CNI plugin for Kubernetes that provides advanced networking functionality, including network encryption and observability features. Weave Net uses a virtual network overlay to connect containers across nodes in the cluster.
To install Weave Net, you can use the following command:
kubectl apply -f "https://cloud.weave.works/k8s/net?k8s-version=$(kubectl version | base64 | tr -d '\n')"
Conclusion
Kubernetes networking is a complex and ever-evolving topic, but by understanding the key concepts like Services, Ingress, Network Policies, DNS, and CNI plugins, you can build and manage a robust and scalable Kubernetes cluster. In this blog post, we provided advanced explanations and code examples to help you get started with Kubernetes networking. With these examples and concepts, you should be able to create, manage, and troubleshoot Kubernetes networking in your own deployment. It's important to stay up-to-date with the latest developments in Kubernetes networking to ensure that your deployment is secure and efficient. Additionally, there may be advanced networking concepts and techniques that are specific to your use case or deployment environment, and it's important to research and learn about them as needed. Nonetheless, this blog post provides a comprehensive and advanced overview of Kubernetes networking and should be a useful resource for anyone looking to learn about the topic.

Thank you for reading this Blog. Hope you learned something new today! If you found this blog helpful, please like, share, and follow me for more blog posts like this in the future.
If you have some suggestions I am happy to learn with you.
I would love to connect with you on LinkedIn
Meet you in the next blog....till then Stay Safe ➕ Stay Healthy
#HappyLearning #Kubernetes #KubernetesNetworking #KubernetesServices #KubernetesIngress #KubernetesNetworkPolicies #KubernetesDNS #KubernetesCNI #Calico #Flannel #WeaveNet #ContainerNetworking #Containerization #Microservices #devops #Kubeweek #KubeWeekChallenge #TrainWithShubham #KubeWeek_Challenge #kubeweek_day2


